PC fan placement: airflow, pressure, and mistakes to avoid (2026 guide)

PC fans airflow PC case cooling 2026 guide

Practical 2026 guide: where to place PC fans (intake/exhaust), positive vs negative pressure, 2/3/4/6-fan layouts, filters, GPU/CPU hotspots, and AIO top vs front — with diagrams and a checklist.

Why fan placement matters more than RGB

In 2026 you can buy RGB fans at every price point — and plenty of builds still throttle because the air isn’t moving. Placement (where, which way, with what pressure) moves temperatures more than bolting on a sixth fan “because it looks cool”.

This DropReference guide is a hands-on playbook: checklists, airflow diagrams, 2/3/N-fan layouts, pressure +/−, filters, GPU/CPU hotspots, and AIOs. Deliberately install-focused — not a YouTube recap (Gamers Nexus, Linus Tech Tips, Hardware Unboxed, JayzTwoCents, Paul’s Hardware…), even though their themes (pressure, dust, radiators) shaped the structure.

  • Goal #1: a clear air path (intake → components → exhaust)
  • Goal #2: slight positive pressure to manage dust
  • Goal #3: don’t break the graphics card’s airflow

Airflow anatomy: intake, exhaust, path

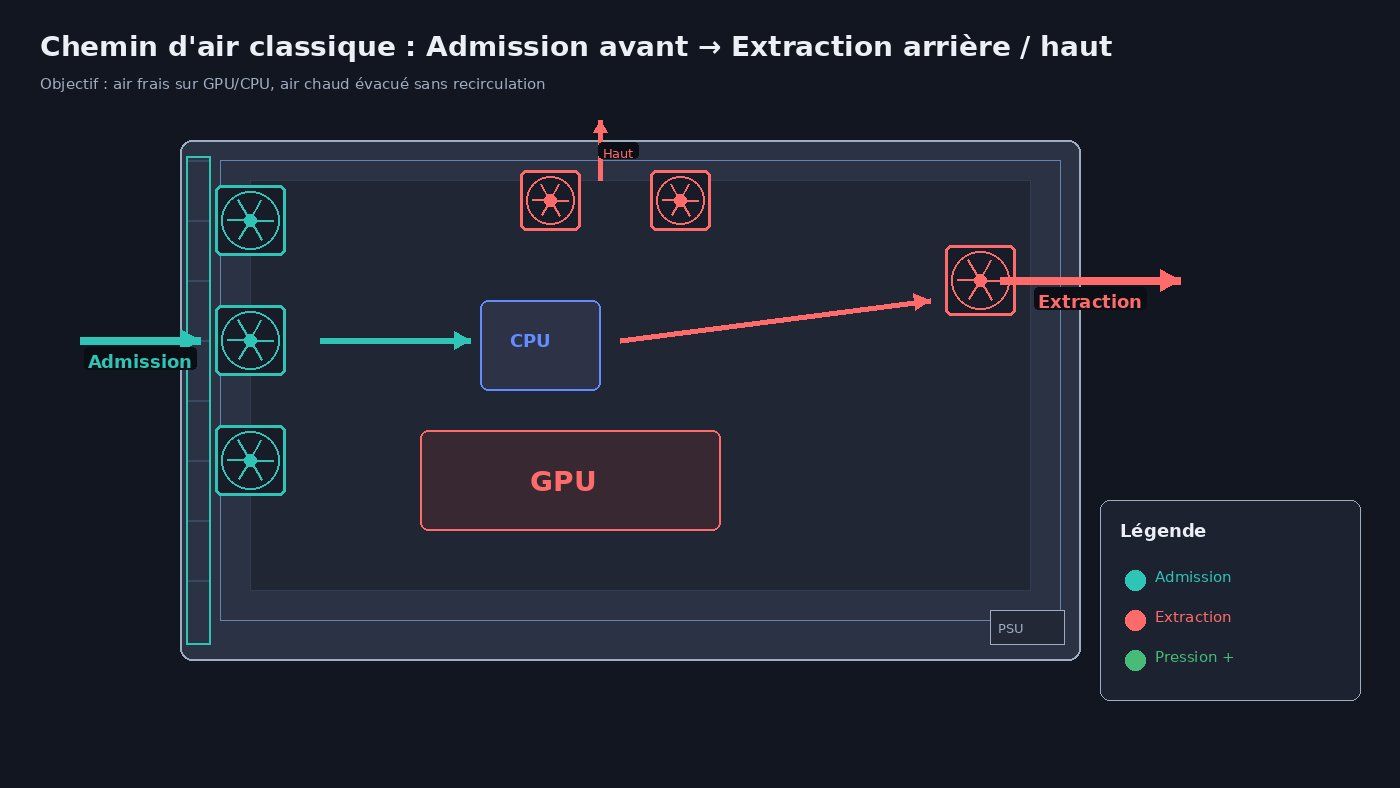
Schéma flux d'air PC : admission avant, extraction arrière et haut Click to enlarge

In a classic ATX tower, cool air enters at the front (and sometimes the bottom), crosses the GPU then the CPU cooler / block, and leaves at the rear and/or top. Heat rises: the top of the case is a natural exhaust.

  • Intake: pushes fresh air inside — ideally filtered.
  • Exhaust: dumps hot air — rear almost mandatory, top as a complement.
  • Path: avoid short-circuits (fresh air escaping through the top too early).

DropReference rule: front / bottom = intake; rear / top = exhaust. Side fans depend on the case (fishbowl, dual-chamber) — follow the manual, but keep one consistent direction.

Mesh front vs solid panel: intake decides everything

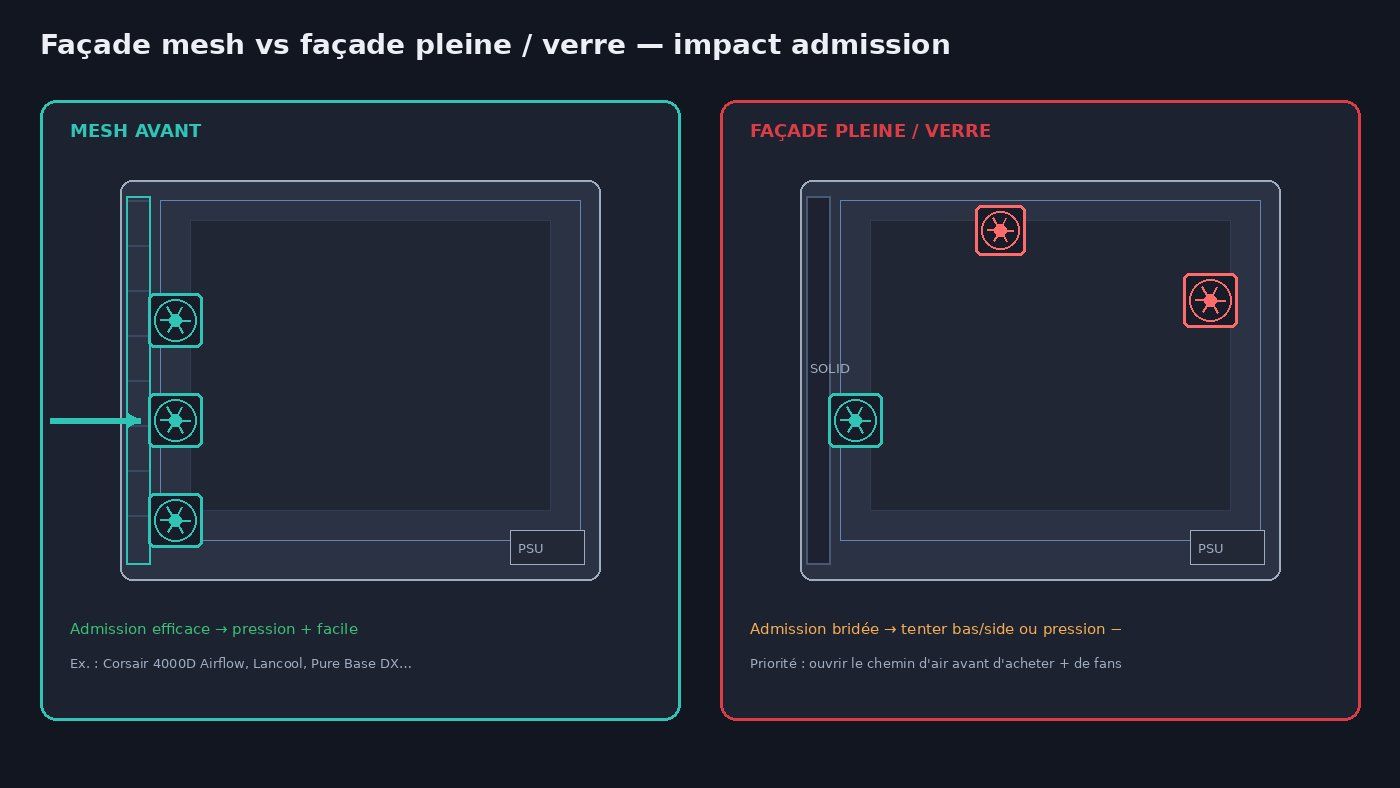
Façade mesh vs façade pleine : impact sur l’admission d’air Click to enlarge

A mesh-front case (4000D Airflow, Lancool, Pure Base DX… style) lets a lot of air in: positive pressure is easy. A solid / glass front starves intake: front fans “pull from nowhere” and the case sucks air through every gap.

Before buying three more fans: check whether your front panel actually passes air. Gamers Nexus case charts and Hardware Unboxed / Paul’s Hardware airflow guides all hammer the same point — panel restriction often beats “10 fan slots” marketing.

Positive vs negative pressure: dust, temps, when to pick which

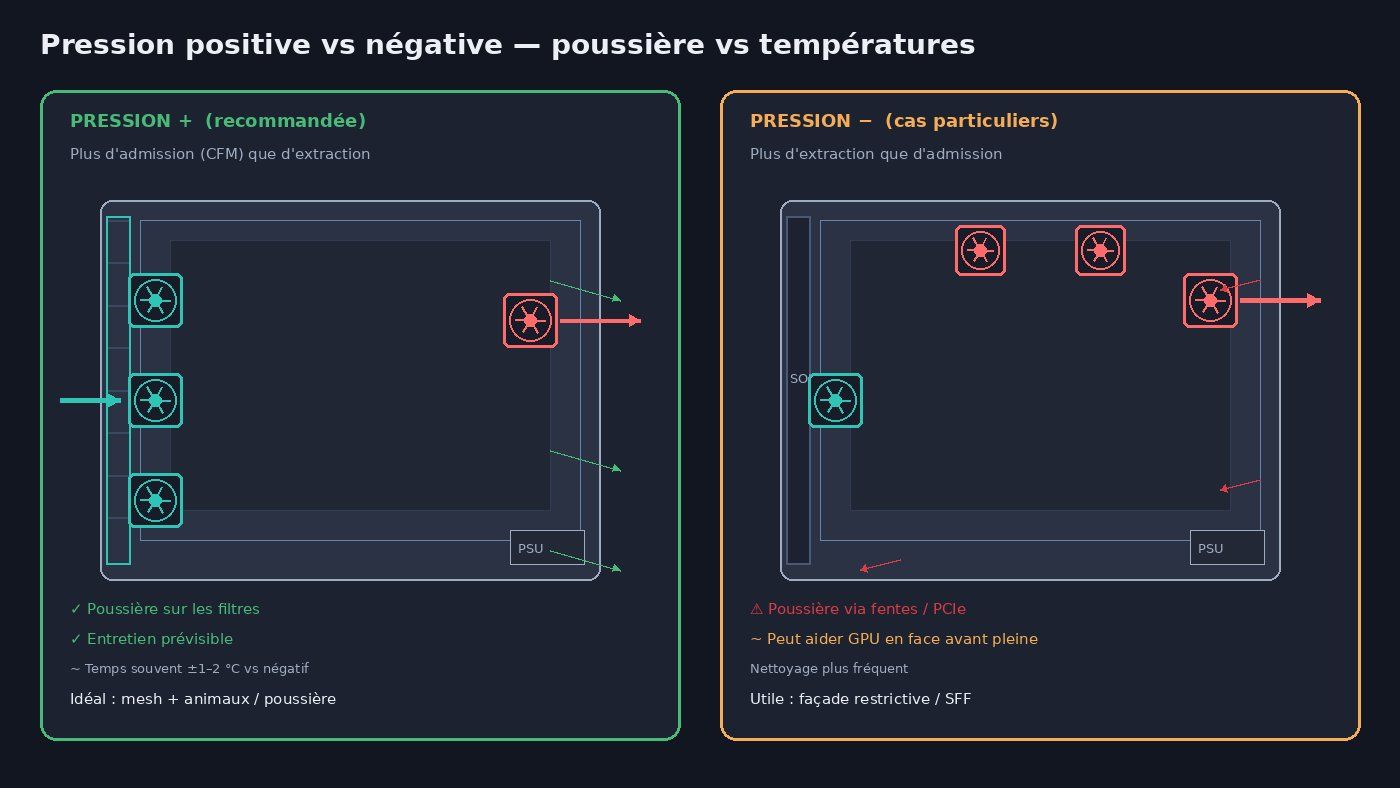
Comparatif pression positive vs négative dans un boîtier PC Click to enlarge

Case “pressure” isn’t a sealed manometer: it’s the intake vs exhaust CFM balance (count × size × RPM × filter/radiator restriction). In practice:

  • Positive pressure: more air in than out → excess exits through gaps → dust mostly lands on filters.
  • Negative pressure: more exhaust → the case also pulls through PCIe slots, cable cutouts, I/O → dust everywhere.
  • Neutral: near-zero balance — predictable flow, middling dust.

Temperature gaps between + and − are often on the order of 1–2 °C on typical builds (ballpark figures from hardware press, not a universal promise). The real 12-month delta is dust: Linus Tech Tips’ long-run “1 year air pressure” test mainly reminds you that filters on every intake matter as much as the +/− sign.

DropReference pick for 2026: slight positive pressure by default (pets, floor, dusty room). Switch to light negative only if a very restrictive front / SFF build and GPU temps justify it — and accept more frequent cleaning.

Criterion Positive pressure Negative pressure Neutral
Typical setup More intake CFM More exhaust CFM Near-even balance
Dust On filters (cleaner) Through gaps / PCIe In between
Temps (ballpark) Sometimes +1–2 °C Sometimes −1–2 °C Case-dependent
When to choose Mesh, pets, easy upkeep Solid front, SFF, GPU-limited Well-tuned 1:1 curves
Baseline fans 2–3 front in + 1 rear out Few in + top/rear out Match intake/exhaust RPM
Swipe to view more

Typical layouts with diagrams: 2, 3, 4, and 6 fans

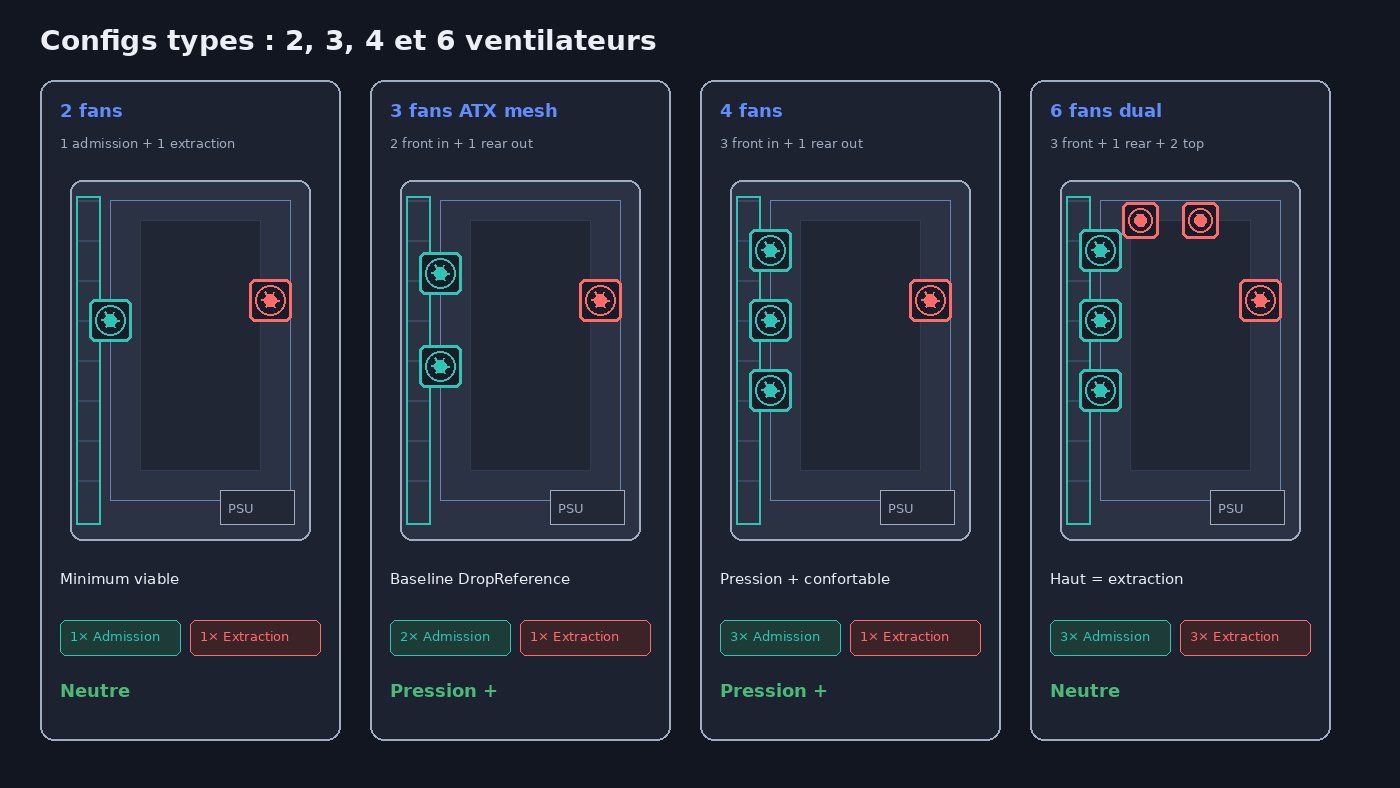
Configs 2, 3, 4 et 6 ventilateurs : admission et extraction Click to enlarge

More fans ≠ better cooling. Past a sound air path, gains shrink fast (diminishing returns — a recurring Tom’s Hardware / LTT theme). Nail geometry first.

  • 2 fans — 1 front intake + 1 rear exhaust: minimum viable, often neutral.
  • 3 fans ATX mesh — 2 front in + 1 rear out: DropReference baseline for positive pressure.
  • 4 fans — 3 front in + 1 rear out: comfortable positive pressure on a mid-tower.
  • 6 fans — 3 front in + 1 rear + 2 top out: top as exhaust; watch for front-top short-circuit.
  • ITX / compact — prioritize the path to the GPU; 1–2 filtered intakes + 1 targeted exhaust beat five fighting fans.
  • Dual-tower / fishbowl — follow the manual (often bottom GPU intake); don’t reverse flow “for the look”.
Fan count Intake Exhaust Typical pressure Use case
2 1× front 1× rear Neutral Mini / quiet
3 2× front 1× rear Positive Baseline ATX mesh
4 3× front 1× rear Positive Mid-range gaming
5–6 3× front (+1 bottom) 1× rear + 1–2× top Neutral / light + High-end / top AIO
ITX 1–2 filtered 1 targeted Case-dependent High density
Swipe to view more

Orientation & reading the arrows on the frame

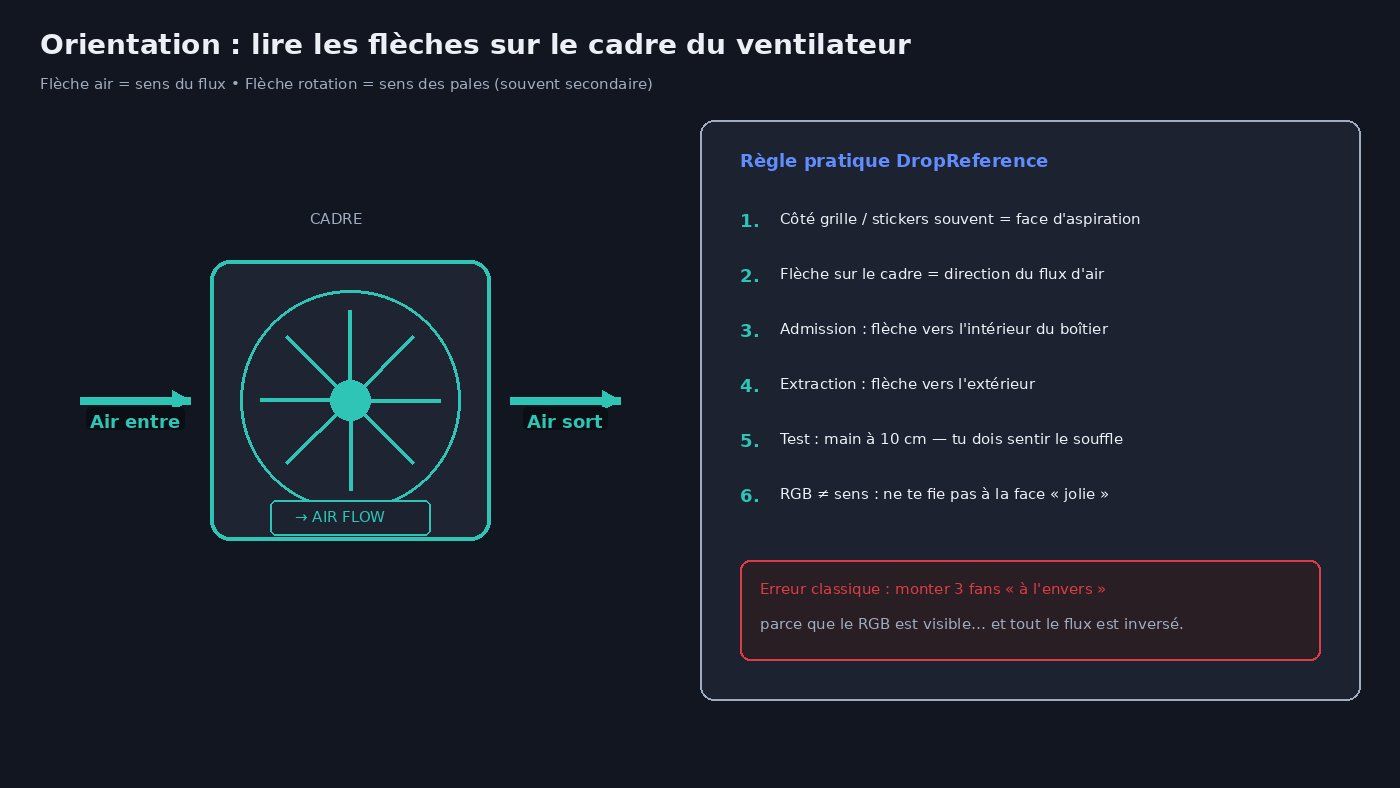
Comment lire les flèches admission/extraction sur un ventilateur PC Click to enlarge

Almost every fan has an airflow arrow molded into the frame. That arrow is what counts — not the RGB face.

  1. Find the “air flow” arrow on the frame.
  2. Intake: arrow points into the case.
  3. Exhaust: arrow points out of the case.
  4. Tip: the grille / sticker side is often the intake face — still verify.
  5. Hand test ~10 cm away: you should feel the blow in the intended direction.

Classic mistake: mounting three fans “pretty face toward the glass” and ending up with the whole flow reversed. The case becomes a recirculation mess — and RGB cools nothing.

Filters, dust, and maintenance

Filtres anti-poussière et chemins de poussière dans un boîtier PC Click to enlarge

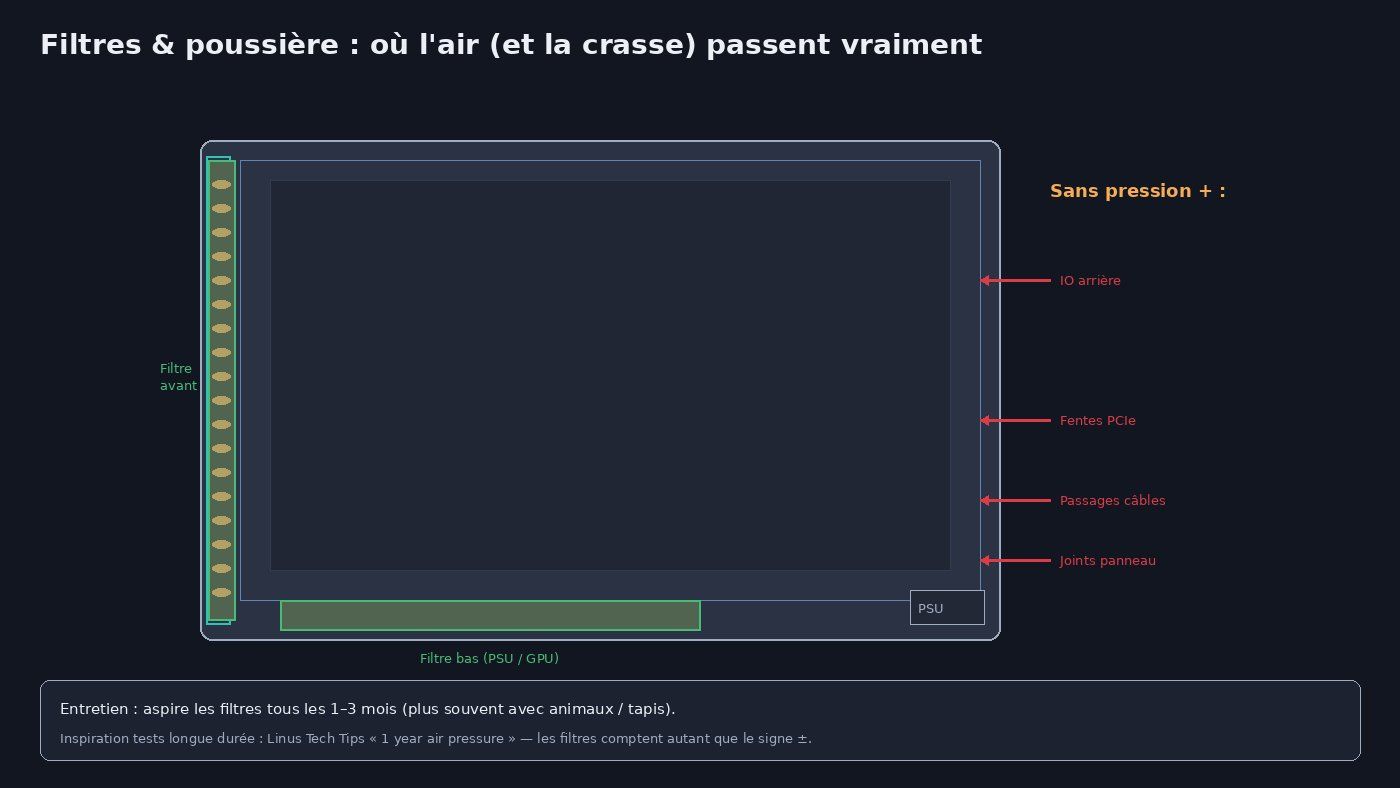
Positive pressure only works if every intake is filtered. One unfiltered intake kills the idea: air (and dust) prefers the free path.

  • Vacuum / wash filters every 1–3 months (more often with pets or carpet).
  • Never park the PC on carpet that blocks the bottom.
  • A clogged filter = ghost intake → you slide into negative pressure without noticing.
  • Bottom GPU intakes: leave space under the case (feet / stand).

Long-term, dust on GPU/CPU fins costs far more than 1 °C of “wrong” pressure. That’s the real takeaway from “one year dust” hardware YouTube experiments.

GPU + CPU: don’t break the graphics card’s airflow

Bonnes et mauvaises configs de ventilateurs PC — erreurs classiques Click to enlarge

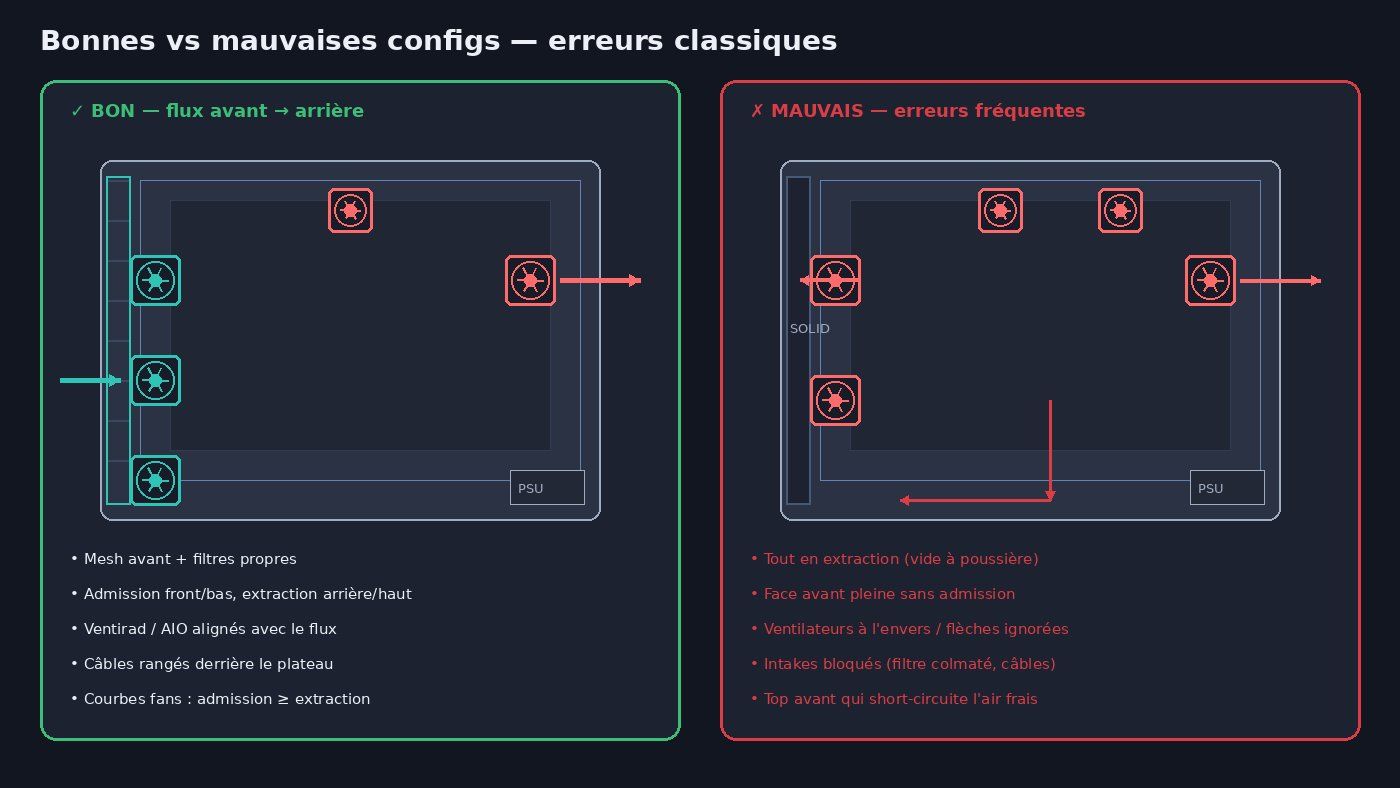
Modern GPUs (especially open-shroud / flow-through) dump a lot of heat into the case. Your job: feed them fresh air and evacuate that reject heat — don’t recycle it.

  • Avoid top exhausts that sit too far forward and short-circuit fresh air before the GPU.
  • Bottom intake (if the case allows) feeds the card directly.
  • Dual-tower air cooler: aim fans with the case flow (front → rear).
  • Don’t place a fan blowing against the GPU’s exhaust.
  • Cables in front of the GPU = thermal wall — route behind the tray.

If you mostly game (GPU = hotspot #1), prioritize a path that protects GPU intake even if the CPU loses 2–3 °C. Flip that for long 100% CPU renders.

AIO radiator: top vs front (trade-offs)

Radiateur AIO en top extraction vs front admission — tradeoffs GPU/CPU Click to enlarge

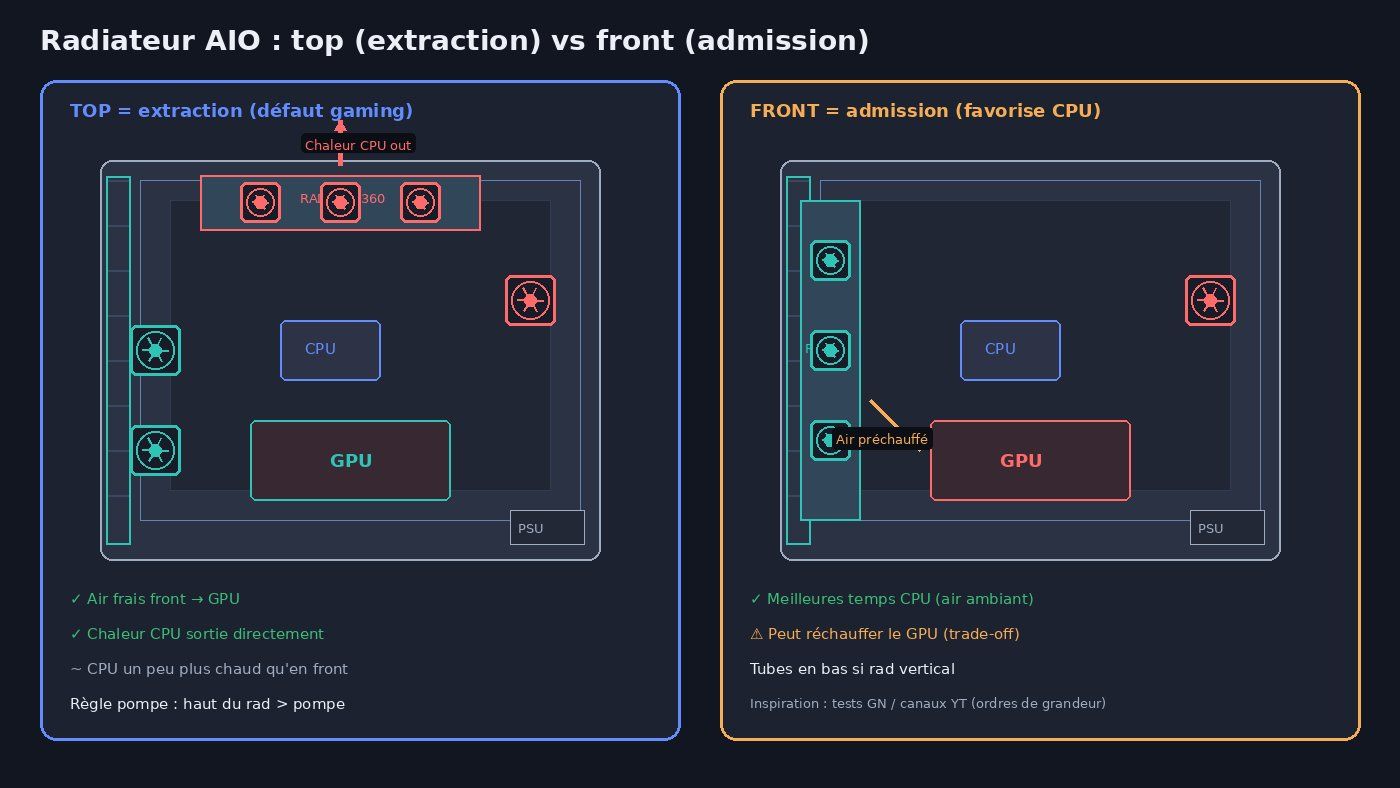
Two placements dominate — the “best” one depends on your load:

  • Top as exhaust — gaming default: CPU heat leaves the case; front fresh air stays for the GPU.
  • Front as intake — often better for the CPU (ambient air on the rad) but pre-heats the air feeding the GPU.

Gamers Nexus-style tests (e.g. 240 front vs top rad configs) typically show a few-°C swap: front can favor the CPU, top often rebalances the GPU. Keep the order of magnitude, not a magic number for your case.

Pump rule (non-negotiable): the highest point of the radiator must stay above the pump. Vertical rad: tubes at the bottom. Never a rad at the bottom of the case. For product picks, see our linked watercooling / AIO comparison guides below.

Fans on a radiator: prefer static pressure (dense fins). Open mesh case fans: airflow (CFM) matters more. Modern all-rounders (e.g. Noctua A-series lines) often cover both — read the datasheet, not the RGB.

Build checklist + classic mistakes

Before you close the side panel:

  1. Mesh front or alternate intakes open?
  2. Front/bottom = intake, rear/top = exhaust?
  3. Frame arrows the right way (hand test)?
  4. Filters on every intake?
  5. CFM / curves: intake ≥ exhaust (light positive pressure)?
  6. Cables clear of the GPU path?
  7. AIO: top of rad > pump; tubes OK?
  8. 10-min CPU+GPU stress: temps and noise acceptable?

Mistakes to avoid:

  • All exhaust (“more pull is better”) — guaranteed dust.
  • Fans flipped for RGB.
  • Blocked intakes (black-crusty filter, case on carpet).
  • Front-top stealing fresh air before the GPU.
  • Buying six mediocre fans instead of three good ones well placed.
  • Ignoring front-panel / radiator restriction in the pressure math.

Short FAQ — fans and airflow

How many fans minimum?

On a mid-tower mesh: 2 (1 in + 1 out) works; 3 (2 in + 1 out) is the silence/temps sweet spot for most 2026 gaming builds.

Do I always need positive pressure?

By default yes, for dust. Light negative only if GPU measurements + a restrictive front justify it.

140 mm or 120 mm?

At equal RPM, 140 mm often moves more air with less noise. Take what the case actually accepts (and matching filters).

PWM and curves: where to start?

Gentle curve under 50–60 °C GPU/CPU, then ramp progressively. Run intakes a bit higher than exhausts to stay positive.

Does RGB add heat?

Negligible. The real RGB cost is mounting fans backwards “for the photo”.

DropReference verdict: place the airflow, not the LED carpet
In 2026, good airflow is still easy to say and too rare to execute: filtered intake front/bottom, exhaust rear/top, light positive pressure, a radiator that doesn’t sacrifice the GPU for no reason. Start with the checklist, validate with 10 minutes of real load, then fine-tune curves.

Next steps on parts: case, air cooler, and AIO guides linked below. And if you’re already optimizing airflow more broadly, cross-check our other “optimize airflow 2026” guide — this one stays deliberately focused on placement / install / diagrams.